
If you’re shopping for violins, but not quite sure yet what you’re looking for…
Or how to tell the difference between one model and the next…
You’ve come to the right place.
Because in this ultimate guide, you’re about to get a crash-course in everything a keyboard player would care to know, when upgrading their setup.
First up…
How to Choose the Right Violin Size
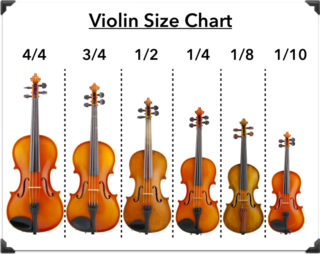
When starting out, the first thing to do is settle on 1 of the 6 sizes.
For larger adults, the choice is easy. Just go with a full size 4/4 violin.
With kids and smaller adults though, sizes are measured by arm length.
To find the right size for you:
- Take out a measuring tape
- Extend your arm to the side
- Measure from the mid-palm to your neck
Based on that measurement, you can find your ideal size right here:
- Under 16 in – choose a 1/10 violin
- 16 in – choose a 1/8 violin
- 16.5 to 18 in – choose a 1/4 violin
- 18.5 to 20 in – choose a 1/2 violin
- 20.5 to 22 in – choose a 3/4 violin
- 23 in or more – go with a full size violin
Up next…
Our Top Recommended Violins at Each Price Range
While we still have a lot to cover yet in your “violin education”…
I’d like to take a quick moment before we continue, to give you a general idea of the different price ranges of violins, and what you can expect from them.
That way, you’ll have a better context as we continue through this post.
So here are the links:
Budget Violins (under $500)
- Mendini by Cecilio Violin Set (full-size) – (Amazon)
- Eastar Violin Set (half-size) – (Amazon)
- Stentor Violin (full-size) – (Amazon/Thomann)
- Antonio Giuliani Primo Violin – (Amazon)
Mid-range violins (up to $1500)
Premium violins (Above $1500)
- DZ Strad Maestro Old – (Amazon)
- DZ Strad 509 – (Amazon)
- DZ Strad 800 – (Amazon)
- Conrad Götz Heritage Cantonate – (Thomann)
- Scala Vilagio R.O. Guarneri Superieur Solo – (Thomann)
Now let’s move on…
Which Woods Are Commonly Used For Violin Making?
For the most part, there are only 2 commonly used woods in violin making:
- Spruce – which is ideal for violin tops because of its strength and workability
- Maple – which is denser and mainly used for aethetics in areas where the sound is minimally affected.
Occasionally you might encounter poplar wood as well, but that’s it.
Up next…
The Essential Parts of the Violin You Need to Know
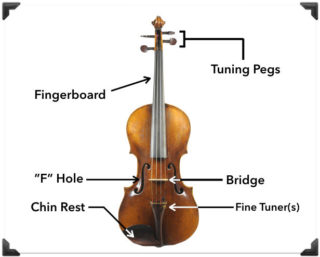
On a violin, there are actually over 70 different parts in total.
In the image shown, you can see a very basic anatomy of the important external parts.
Most of these are pretty self-explanatory if you’ve ever played any sort of stringed-instrument before.
INSIDE the violin though, there are 2 far less obvious parts, that significantly influence sound:
- The Soundpost – on the treble side of the violin
- The Bassbar – on the bass side
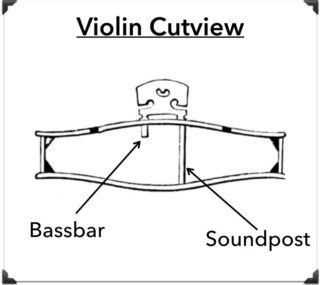
So next, let’s take a look at each of these in more detail.
What Exactly Does the Soundpost Do on a Violin?
In many languages, the soundpost is called the “soul” of the violin…
Which is a pretty good indicator of its importance.
In terms of function, it serves 2 roles:
- Preventing the belly from collapsing under tension of the strings
- Transmitting vibrations from the top plate to the back plate, for a richer, fuller sound
Depending on the its position, the sound post has the ability to dramatically transform the sound.
While luthiers have varied opinions on ideal placement, the general consensus is:
- For a brighter sound – it should be close to the right of the E string
- For a darker sound – it should be closer to the G string
Up next…
What Does the Violin Bassbar Do?
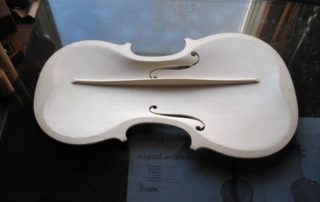
The bassbar, like the soundplate, has two similar jobs.
- Strengthening the top plate
- Transmitting low frequencies specifically, to the back plate.
And the resulting sound/performance of the violin is heavily influenced by factors such as:
- Height
- Thickness
- Shape
- Position
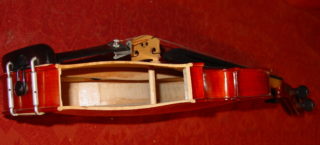
For example: As you can see in the image, the bass bar is actually tapered out on both ends. This is done to prevent the bar from falling over.
Up next…
How Does the Bow Affect a Violin’s Sound?
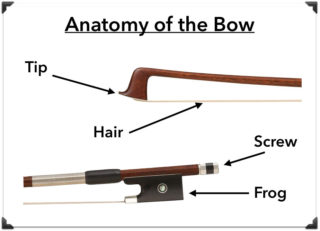
While not technically part of the violin, the bow actually ranks pretty high in regards to impact on the instrument’s tone.
So what makes a good bow exactly?
Well for starters:
- Horse Hair – white mongolian horses are said to give the best hair for violin bows
- Wood – pernambuco wood is considered as the best wood for violin bows. Fiberglass and carbon fiber are two common wood alternatives.
- Balance Point – the closer to the tip, the heavier the bow will feel. The closer to the frog, the lighter it will feel.
Based on a combination of these and other features, quality bows can range in price from a few hundred bucks, to several thousands of dollars.
So here are some cheaper wooden bow options I recommend for beginners:
- ADM Brazilwood – (Amazon)
- Londoner Three Star – (Amazon)
- DZ Stradi 524 – (Amazon)
- Paititi bow – (Amazon)
- Fleur-de-Lys Bow – (Amazon)
If you think you’d prefer a more lightweight/durable carbonfiber bow, check out these instead:
- Kmise Carbon Fiber – (Amazon)
- VingoBow Carbon Fiber – (Amazon)
- Fiddlerman Carbon Fiber – (Amazon)
- CodaBow Diamond GX – (Amazon)
Up next…
How to Rosin Your Bow Before Playing
Since we’re already on the topic of bows, let’s quickly discuss some pre-playing preparation which you may not know about.
Befoer each practice/playing session, you’ll need to:
- Tighten the Hair – by turning the screw clockwise
- Apply Rosin – which is necessary to get any sound from your bow.
- Loosen the Hair – after you’re done playing
Here’s a quick video explaining it:
Now here are some rosins I recommend:
Up next…
Is a Shoulder Rest Really Necessary?
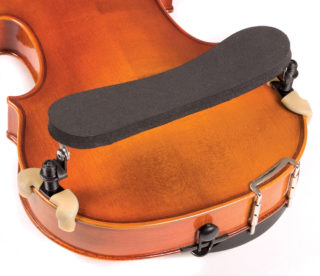
While technically only an accessory to the violin itself…
The shoulder rest is actually quite crucial for playability, with violinists of all levels.
Its two main purposes are:
- Securing the violin to the shoulder
- Generally increasing comfort for longer playing sessions
Without one, your clavicle will hurt and you’ll grip your violin way too tightly for fear of it falling. So in effect, it’s a virtual necessity.
Here are the ones I recommend:
- Fiddlerman Wood – (Amazon)
- KUN Original – (Amazon/Thomann)
- Everest EZ4A – (Amazon)
- Bonmusica Shoulder Rest – (Amazon/Thomann)
Up next…
Standard and Alternate Tunings
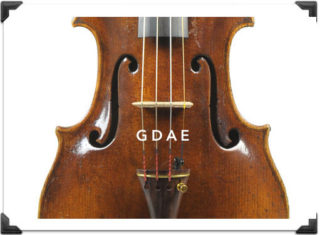
Unlike many stringed instruments such as the guitar, which is tuned in perfect 4ths…
The Violin is actually tuned in perfect 5ths.
Which means starting from the low G string, standard the standard tuning is:
- G
- D
- A
- E
In most classical, jazz, and folk music, this is the tuning that is used.
Occasionally however, alternative tunings may be used as well. Some of the more common ones being:
- A D A E
- G D A E♭
- G♯ D A E♭
Up next…
How to Tune Your Violin
Compared to other string instruments, the violin can definitely be one of the more difficult to tune correctly, especially for beginners.
So to help you get the hang of it, here’s a video that you’ll find useful:
Regarding tuners, here are the models I recommend:
- Snark SN5X (general instrument tuner) – (Amazon/B&H)
- D’Addario Micro NS (Specifically designed for violin) – (Amazon)
- Peterson StroboClip HD (Highest accuracy) – (Amazon)
Up next…
Replacing Your Violin Strings

At some point, depending on your playing frequency, it will eventually be time to replace those strings.
When that day comes, the first task will be choosing the right string set.
The 2 key factors to consider here are:
- String Material
- String Gauge
The 3 most common string materials are:
- Gut – which has the best tone, but least durability
- Steel – which is more durable but doesn’t sound quite as good
- Synthetic Nylon – which offers a great combination of both tone and durability
The 3 most common string gauges are:
- light gauge – which is best for beginners
- medium or high gauge – which generally works better with more advanced players
Beyond that, it’s all a matter of comparing between the popular sets, which you can see here:
- D’Addario Prelude – (Amazon/Thomann)
- Thomastik Dominant – (Amazon/Thomann)
- Pirastro Tonica – (Amazon/Thomann)
- Thomastik Peter Infeld (handmade) – (Amazon/Thomann)
Up next…
How to Replace Violin Strings
After choosing a set of strings, you still need to mount them on your violin.
But rather than describe this process, it will be easier to just show you a video instead:
Up next…
Electric Violins vs Acoustic Violins
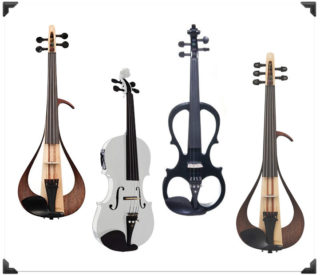
While you might think they look kind of weird compared to their acoustic counterparts…
Electric violins are gaining popularity these days due to a number of useful advantages.
First off, just like an electric guitar, you have almost an unlimited number of options with shaping its tone using integrated effects, racks/pedals, and amps.
Second, and perhaps more importantly, you can use them to practice in silence. And quite honestly, noise is the #1 obstacle to practicing almost any instrument.
So as a beginner, it can be a great idea to have an electric violin alongside your acoustic one.
As you’ll see in the list below, electric violins are actually far more affordable than they used to be 15-20 years ago…so there’s really no good reason not to at least consider them.
Budget Electric Violins
- Cecilio CEVNAE (Acoustic-electric) – (Amazon)
- Cecilio CEVN 1BK – (Amazon)
- Cecilio CEVN 2BK – (Amazon)
- Harley Benton HBV 990BCF – (Thomann)
Premium Electric Violins
- Yamaha YEV104NT – (Amazon/Thomann)
- Yamaha YEV105NT – (Amazon/Thomann)
- Yamaha SV250 – (Amazon/Thomann)
- NS Design WAV4 – (Amazon/Thomann)
For a cheaper (although not quite as good) solution to silent practicing, you could try one of these practice mutes instead:
Up next…
Are Online Lessons a Good Idea?
The violin, perhaps more than any other instrument, is one that almost certainly requires some lessons when first getting started.
Traditionally, in-person lessons have been the norm, but these days, it’s increasingly common to go online instead, mainly because of how much cheaper it is, even amongst the paid options.
So to make things easier, I’ve created a short directory below of both free and paid online violin courses.
- FREE Online Violin Courses
- fiddlerman.com – Pierre Holstein aka Fiddlerman has been a reference on free online violin lessons for almost 10 years now. He stands out as a very versatile player who doesn’t only focus on classical music. On top of that all his lessons are available as videos on youtube and he usually answers questions there too.
- violinonline.com – if feel more comfortable reading, this website is probably the most comprehensive one in terms of resources. It takes you all the way from beginner level to very advanced.
- PAID Online Violin Courses
- Itzhak Perlman – One of the most famous classical violinist of our times, Itzhak Perlman is now part of the MasterClass website. In case you didn’t know it, MasterClass.com is a website where famous people from all areas teach their skills.
- Artistworks.com – This website specializes in online music courses, and their violin instructor happens to be Richard Amoroso, a respected classical violinist. With this website you get to send your own video to the instructor and he will send his in return to guide you through your mistakes.
- Violinlounge.com – Holland born classical violinist Zlata Brouwer is the teacher behind this website and she actually offers a lot of free content for beginners. However, if you want to take your playing to the next level she has also got you covered with more advanced material.
A “Cheat Code” for Total Beginners
When you’re starting out on the violin, one of the most frustrating parts is learning to find the right note, without any sort of visual reference
So as a sort of “cheat code” a brand called Don’t Fret developed these stickers that mark out the notes on the fingerboard.
Check it out:
Also check out this model which, although a bit more expensive has much more information on it:
- Fretless Finger Guide – (Amazon)
Up next…
Why are Stradivarius Violins so Expensive?
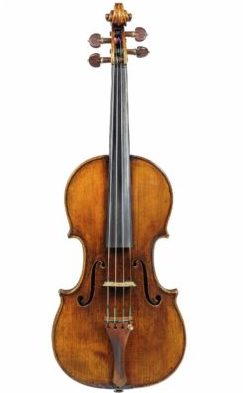
To wrap up this post, I’d like to end with a random question about violines, that we’ve all wondered at some point:
Why is a Stradivarious so expensive?
Even among non musicians, the Stradivarius is a common household name.
For some reason, these violins often fetch astronomical prices, yet few people actually know why.
Well for starters:
- They ‘re around 300 years old
- Only around 650 models available worldwide
- They’ve been played by many famous musicians throughout history
But those only speak to the subjective value of the instrument. In terms of sound, the value is much less clear.
Scientists, musicians and engineers have tried to analyze, study and understand the building methods of Antonio Stradivari…but nothing truly conclusive ever resulted.
In fact, blind tests have been done, and many participants preferred the sound of newer violins to the Stradivarius.
So is it all hype? Who knows.
By the way, if you found this post useful, I highly recommend joining our free Home Recording Secrets email newsletter where you’ll discover….
- How to Get Your First Studio Up and Running in a Single Weekend
- How to Avoid Wasting Thousands of Dollars on Unnecessary Pointless Purchases
- How to Get a “Million Dollar” Pro Studio Sound in a “Thousand Dollar” Home Studio
- PLUS… All Sorts of Other Amazing Insider Secrets Revealed
And it’s totally FREE! Click here and Enter Your Email to Sign Up.
Similar Posts in this Series:
Ukuleles | Electric Ukuleles | Bass Ukuleles | Ukulele Strings | Violin | Autoharp | Mandolin | Banjo | Dulcimer