
If you’re shopping for flutes, but aren’t quite sure what you’re looking for…
Or how to tell the difference between one model and the next…
You’ve come to the right place.
Because in this ultimate guide, you’re about to get a crash-course in everything a new player would care to know, when first getting started with this instrument.
First up…
What Type of Flutes are We Talking About?
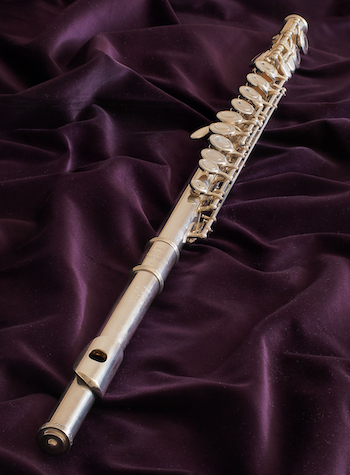
As the oldest melodic instrument in history…there are literally thousands of flute types, from virtually every culture.
Which of course, is way too much to cover in one post…
So for today, we’ll be focusing entirely on the Western Classical Flute, aka the transverse flute (and once known as the German Flute)…
Simply because it’s popular and versatile flute used across many genres of music.
If you’ve seen a flute played in any context of Western music, chances are it was this type.
Up next…
Anatomy of the Western Classical Flute
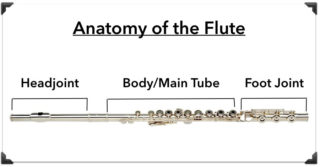
The instrument consists of 3 parts:
- Head Joint – which holds the mouthpiece
- Main Tube– which holds most of the keys
- Foot Joint – which holds the remaining extra keys
First off…
The Head Joint
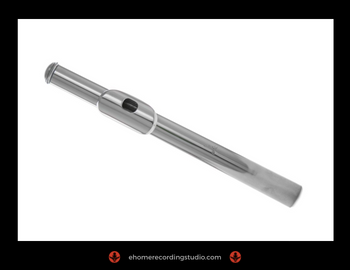
While it might look like a simple piece…
The headjoint actually has 6 parts that influence its sound and playing technique:
- The Embouchure Hole
- The Lip Plate and the Riser
- The Crown/cork/reflective plate
- The Riser
- The Tapering of the headjoint
- Straight/Curved headjoint
So let’s take a closer look at each piece…
1. The Embouchure Hole
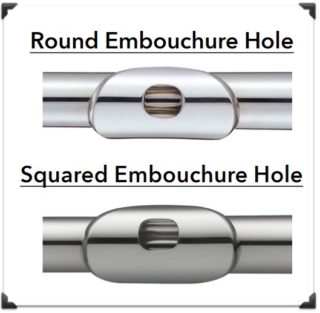
Unlike most woodwinds, which create sound with a vibrating reed…the flute is one of that’s entirely reedless.
Instead, here’s how the sound is created:
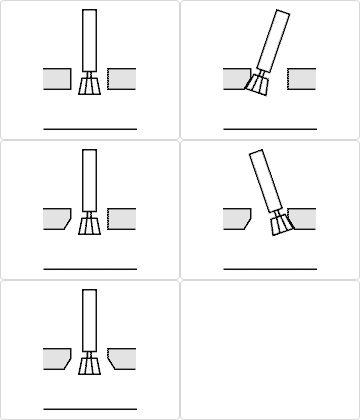
When blowing into the embouchure hole, the stream of air you create needs to be directed at the edge of the embouchure.
As this happens the stream air is “sliced” in 2, with one half going into the hole and the other out of it.
This then creates waves that create the pitch depending on their length.
Key characteristics of the embouchure hole:
- Shape and size – Old flutes used to have an oval shaped hole, while most modern flutes have a more rectangular shaped hole. It is generally agreed upon that it is easier to achieve higher volume with rectangular holes.
- Undercut/Overcut– a rounded edge on the hole improves both sound and playability, vs a straight cut commonly found on student flutes.
Next up…
2. The Lip Plate/Riser
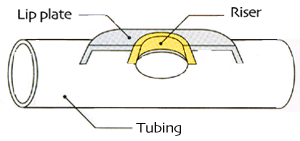
The lip plate is the part of the flute where you rest your lips while blowing.
Some lip plates have a decorative engravings that not only look nice, but offers some grip for the lips.
Certain lip plate materials may cause adverse skin reactions, so some flutists will only to play on gold.
The riser (aka chimney) is the piece that connects the lip plate with the embouchure.
A high riser offers a louder sound, with less flexibility, while a lower riser allows for a softer sound with greater flexibility.
Next up…
3. The Crown/Cork/Reflective Plate
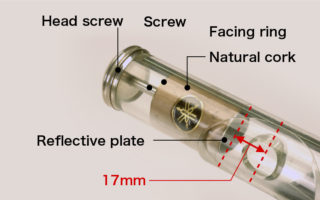
The transverse flute is one of the few woodwinds not open on the rear end.
Instead, it is covered by a small cap known as the crown. (aka head crown or head screw)…
Which is connected by a screw to a cork used to plug the air gap. Plastic corks seem to be ideal in terms of performance.
Finally, a reflective plate connects to the cork, to bounce the sound toward the opposite end.
Next up…
4. The Tapering of the Headjoint
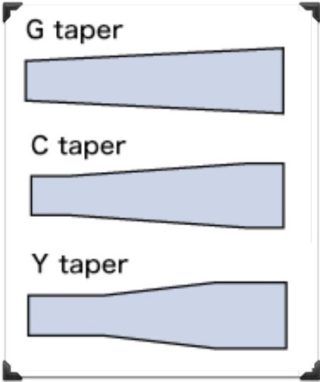
As you can see in the picture…
Headjoints are tapered towards the embouchure hole in 1 of 3 ways:
- C Taper – which is the easiest to play
- G Taper – which is the hardest to play, but offers the best sound.
- Y Taper – which is a compromise between the other two.
So that concludes all the parts of the head joint.
Now let’s move and see what we can learn about the next section of the flute…
The Main Tube/Body

The middle part of the flute is known as the main tube.
It’s the longest section of the 3, and holds 75% of the keys.
Within this section, there are 5 important distinctions to know:
- French vs Plateau keys
- Trill keys
- G key
- High E Mechanism
- Roller Keys
So let’s take a look at these now…
1. French vs Plateau Keys
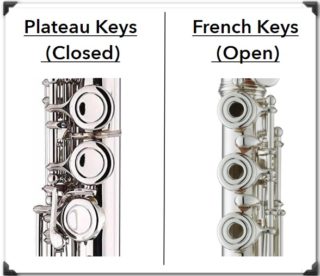
Simply put, french keys are OPEN, meaning they have holes in them.
And plateau keys are CLOSED, meaning they don’t.
Most student flutes use plateau keys, since the no-hole design is easier to play.
More advanced flutes however, use French keys, which are more difficult to learn at first, but allow for more techniques such as:
- Quarter tones and microtones
- Glissandos – (gliding from one note to the next)
- Multiphonics – (playing multiple tones simultaneously)
As a beginner playing with french keys, you can always cover the holes with silicon plugs and play that way until you get more advanced.
Here are some good ones I recommend:
- Canomo Soft Rubber Plugs pack of 20 – (Amazon)
- Leinuosen Silicone Plugs pack of 24 – (Amazon)
- Yamaha Soft Plugs – (Amazon)
Next up…
2. The Trill Keys
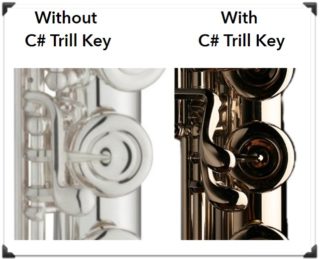
The flute has special keys called trill keys…
Used for the trill effect: alternating rapidly between 2 notes.
Most flutes have 3 trill keys:
- D – which plays C/D
- D# – which plays C/D#
- Bb – which plays G/A
Some pricier flutes also have C# key which allows for a B/C# trill.
Next up…
3. Inline or Offset G Key
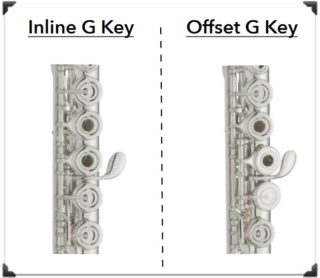
The G key on a flute can either be:
- Inline – which means it’s aligned with the rest of the keys
- Offset – which means it is not aligned with the rest of the keys
This feature is pretty much a no-brainer really, because it is 100% a matter of comfort.
Offset G key flutes were created to ease up the playing position and generally make the playing position more comfortable.
On inline G flutes, the G key is harder to reach because our ring finger — which is the one we use to play the G key — is shorter then our middle finger (at least in most people).
Offset G key flutes also solve some serious physiological issues many flutist face playing inline G flutes, such as:
- tendinitis, or
- carpal tunel
Of course some flutists only swear by inline G flutes, but honestly, unless you have a specific reason to play an inline G flute, just go with an offset G one, you’ll find it much more comfortable to play.
Next up…
4. The High E Mechanism
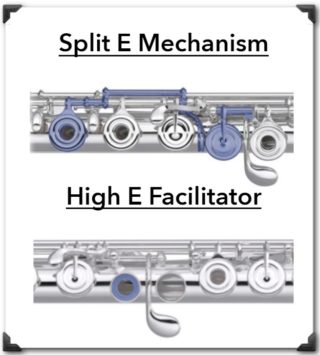
The E3 note — referred to as high E on the flute — is famous for being particularly hard to play…
Which is why flute manufacturers came up with specialized mechanisms made to make it easier to play. There are 2 types of “high E mechanisms”:
- Split E Mechanism – this is the most “complex” mechanism of the 2 and most student flutes have it. It essentially closes the G key when playing a high E, which stays open on flutes that don’t have a split E mechanism.
- High E facilitator – often referred to as the “donut” in the flute community, the high E facilitator is a little metal disc inserted in the G# key to keep the key from closing totally, essentially having the same effect as the split E mechanism.
Ok but why do student flutes only get to have a split E mechanism if it only makes it easier to play the high E?
Well, because it also have drawbacks that — almost — never affect beginners, but are often a deal breaker for advanced and professional players. These are:
- Inability to play some trills – notably G3 to A3
- Additional weight added to the flute – which might be an important issue for some flutists
Moreover, the high E facilitator can be added to the flute at any moment, whereas the split E mechanism can’t if your flute didn’t come with one already.
Next up…
5. Rollers
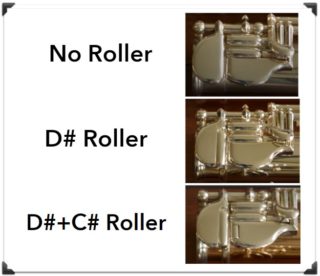
In high end flutes you often find another upgrade: the rollers.
These are small self-rotating rods built into the D# and C# trill keys and meant to make moving your pinkie finger around the footjoint easier…
Since it is often one of the more difficult movement to master on the flute.
You can choose to have a roller on your D# trill key only, or on both D# and C# keys.
And this concludes the Main Tube section.
Now, onto the last part of the flute…
The Foot Joint
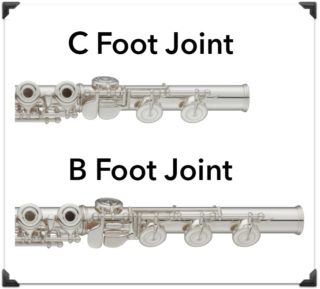
At the bottom of the flute is the foot joint. There are 2 types of foot joints:
- C foot joint – which is the standard with student flutes
- B foot joint – which comes with intermediate and professional flutes and extends the low range of the flute one half-step lower, to B.
The B foot joint may have an extra key, called “Gizmo key” and meant to help playing the high C note.
Now, realistically speaking, the probability that you’ll ever need to play a low B is very low…
And unless you’re playing a symphony in an orchestra you can pretty much ignore B foot joint.
So knowing that, how come most advanced and professional flutists do use a B foot joint on their flute?
Well it seems a B foot joint greatly improves the sound of the flute and particularly the overtones.
And for professional players, anything that has the capacity to improve their tone, even by the slightest, is invaluable.
Next up…
Construction Materials
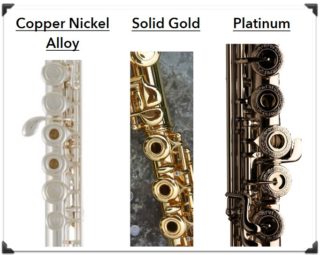
Oddly enough, it is widely agreed-upon that the type of metals used in flute making has minimal impact on sound.
Still, there are different types of metals used in manufacturing, depending on the range.
These metals are:
- Some sort of metal alloy – most cheap flutes are made out of a copper and nickel alloy, called cupronickel, nickelcopper or another name depending on the manufacturer.
- Silver or gold plating – Most student or professional flutes are silver or gold plated
- Solid sterling silver, gold or platinum – The most expensive models are made out of solid precious metals.
If you’re curious to hear the difference between a silver-plated student flute and what’s probably the most expensive flute in the world, made out of platinum, give this video a listen:
Finally, there are some transverse flute made out of wood but they’re pretty uncommon and unless you have a good reason to play one, you can pretty much disregard them.
Next up…
Recommended Flutes
So here is my list of best flutes currently available.
I’ll order it in 3 categories:
- Student flutes – which are cheaper and don’t have some of the options we’ve seen earlier,
- Intermediate flutes – which offer high quality
- Professional flutes – which are more expensive and have more “advanced options.
Best Student Flutes (Under $500)
- Glory Plateau Keysqq C Flute (w/accessories) – (Amazon)
- Mendini Closed Hole C Flute– (Amazon)
- Jean-Paul USA Silver Plated flute – (Amazon)
- Gemeinhardt 2SP– (Amazon)
- Yamaha YFL-222 – (Amazon/Thomann)
- Jupiter WaveLine Flute – (Amazon/Thomann)
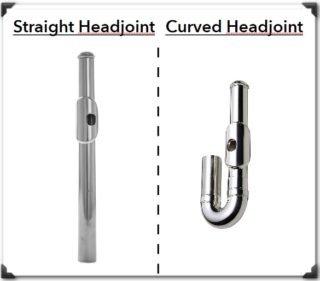
NOTE: As you’ll notice, beginnger flutes for kids often come with a headjoint bent at 180° to shorten the length of the instrument, and bring the embouchure closer to the keys.
Intermediate Flutes (Under $2000)
- Di Zhao DZ400 – (Amazon)
- Gemeinhardt 3OB– (Amazon)
- Pearl Quantz Series– (Amazon)
- Yamaha YFL-281 Series – (Amazon)
- Pearl Dolce Series– (Amazon/Thomann)
Best Professional Flutes
- Yamaha YFL-462– (Amazon)
- Yamaha 577H Series– (Amazon/Thomann)
- Azumi AZ3 – (Amazon/Thomann)
- Haynes AF760 (Amazon)
- Muramatsu EX-III – (Amazon/Thomann)
- Di Zhao 700 – (Amazon)
Next up…
How to Tune Your Flute
Although the flute never falls out of tune dramatically — like a string instrument does in certain conditions for example — it will fall sharp or flat from time to time.
And when it does, it might come handy knowing how to actually tune it back in pitch.
To sharpen or flatten the tone of your flute, first play a concert A on a tuned instrument and compare it withyour flute’s.
Depending if your A is sharp or flat:
- Gently pull the headjoint out of the main tube – it will the tone slightly more flat.
- Push it gently in – it will make it slightly more sharp.
And that’s about it.
Here’s a video showing how to proceed:
Next up…
Flute Care and Maintenance
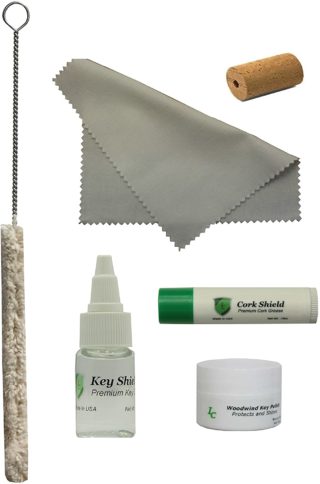
The flute requires regular care, and you actually need to clean it everytime you’re done playing.
Cleaning the flute is done by using a cleaning rod with a piece of cloth wrapped around it, inserting in inside the flute and moving it inside so as to dry the moisture.
Here’s a quick video showing how to use the cleaning rod:
On top of drying your flute everytime you’re done playing, you might need to oil its mechanisms from time to time.
Here are 2 popular choices of cleaning kits:
Next up…
Flute Cases

If you’re planning on taking your flute with you on the go, then you’ll need a case for it.
There are 3 types of cases:
- Gig Bag – which are soft on the outside but molded
- Hard Cases – which offer the highest level of protection
- Handmade bags – which are often handcrafted, unique pieces of leatherwork
So in most cases, people go for a gig bag because:
- They offer good protection,
- Lots of storage compartments, and…
- They are lightweight too.
In terms of pricing they are not necessarily cheaper than hard cases and the high-end models can get pretty pricey;
Check out my rcommendations:
- Vangoa Gig Bag – (Amazon)
- Gator Polyfoam Case – (Amazon)
- ProTec Deluxe Case– (Amazon)
- ProTec MAX Case – (Amazon)
- Beaumont Blue Polka Dot Case – (Amazon)
Hard cases are generally priced the same or even cheaper than gig bags and are generally made out of:
- ABS Plastic – for most models, or…
- Fiberglass – for the more high-end models
Typically if you get yourself a $10k flute you usually won’t mind spending another 200 for a decent case. On the other hand, the same case might seem overkill for a $100 flute.
Check out my recommendations:
- Andoer Portable Gig Box – (Amazon)
- Crossrock Fiberglass Case – (Amazon)
- MTS 809E Case – (Amazon)
- Crossrock Molded Case – (Amazon)
So now for the last type of cases, handcrafted cases. These are generally very expensive, unique pieces of leatherwork.
However, they’re not only good looking as they also offer some decent level of protection.
If you care to check them out, here are 2 of the most renown case makers:
Up next…
Flute Stands
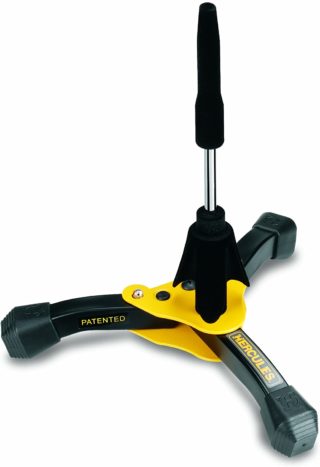
If you find yourself gigging a lot, you’ll need a stand, guaranteed.
And if you don’t gig a whole lot, you’ll need one too.
They might not seem that important at first, but you will soon realize not having a safe place to put down your flute is actually a big pain.
Stands allow you to quickly put down your flute WITHOUT risking damaging it. They’re especially useful in a stage setting if you need to quickly switch from one instrument to another for example.
Here are my recommendations:
By the way, if you found this post useful, I highly recommend joining our free Home Recording Secrets email newsletter where you’ll discover….
- How to Get Your First Studio Up and Running in a Single Weekend
- How to Avoid Wasting Thousands of Dollars on Unnecessary Pointless Purchases
- How to Get a “Million Dollar” Pro Studio Sound in a “Thousand Dollar” Home Studio
- PLUS… All Sorts of Other Amazing Insider Secrets Revealed
And it’s totally FREE! Click here and Enter Your Email to Sign Up.