
If you’re shopping for clarinets, but aren’t quite sure what you’re looking for…
Or how to tell the difference between one model and the next…
You’ve come to the right place.
Because in this ultimate guide, you’re about to get a crash-course in everything a new player would care to know, when first getting started with this instrument.
First up…
Which Clarinets Will We Cover?
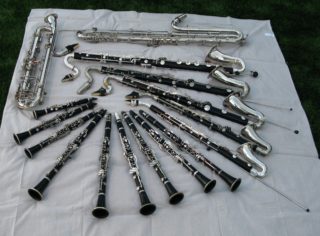
The fact is, there’s a LOT of different variations of the clarinet.
From bass clarinets (low) to sopranino clarinets (high), you could cover the entire range of an orchestra with just this instrument.
However…
For the sake of this article, we we’ll mainly on the Bb clarinet, since it’s play by literally 99% of today’s players.
Let’s continue…
Anatomy of the Clarinet
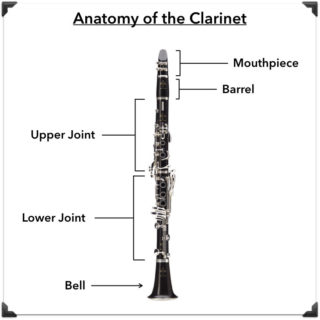
The 4 main parts of the clarinet, from top to bottom are the:
- Mouthpiece
- Barrel
- Keys
- Bell
So let’s look into these parts in more details, shall we?
Starting with…
1. Clarinet Mouthpiece/reed/ligature
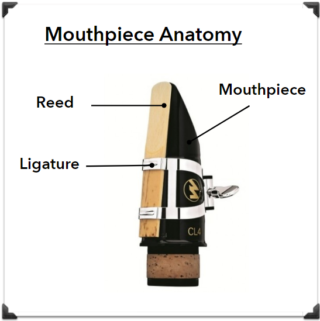
The mouthpiece is the single, most impactful part of the clarinet in terms of sound.
Yes, more than the reeds and actually more than the clarinet itself! In fact, you could theoretically have a pretty bad, cheap clarinet…
But add a great mouthpiece to it (and a good clarinetist preferentially too) and you’ll have yourself an amazing sounding instrument.
The factors affecting the sound produced by a mouthpieces are:
- The cut – Boehm and Oehler clarinets each require their respective type of mouthpiece
- The material – hard rubber, crystal, plastic or wood.
- The chamber – which includes various parts: the throat, the baffle and the sidewalls.
So let’s dig into these characteristic a little bit more, shall we?
First off…
The Cut
As we saw previously, there are 2 types of key systems: Boehm and Oehler. Well, you actually need to match these systems with their respective mouthpiece.
- The Boehm cut – also referred to as French cut/mouthpiece, they have a smaller socket, and an “H-Frame” shaped throat.
- The Oehler cut – also referred to as “German cut/mouthpiece”, these mouthpieces have wider, “A-Frame” shaped throats, and a high baffle.
So, the main thing to remember here is that — theoretically — you can’t fit an Oehler mouthpiece on a Boehm clarinet, and vice versa.
However, you could also — still theoretically — work on the barrel to make it fit one or the other model.
But that’s a way more advanced concept that you might be interested in only if you happen to play one model and truly love a mouthpiece from the other model.
Next up…
The Material
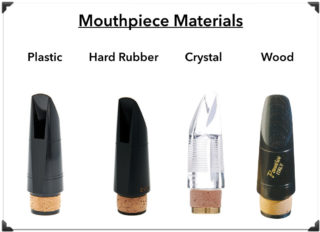
Mouthpieces can be made of:
- Hard Rubber – generally referred to as “ebonite”, it is the most common material and produces a balanced sound and is what most clarinetists go with.
- Plastic – these are the cheapest mouthpieces, used mostly by beginners.
- Crystal – often used by jazz clarinetists, it is the brightest and most projecting material.
- Wood – although these mouthpieces are pretty uncommon, they produce the mildest and softest sound. They’re generally made out of grenadilla wood or ebony (real ebony this time).
Old mouthpieces used to be made out of wood, but presented one major drawback: they were weather sensitive and could “warp” under certain conditions…
Therefore literally changing the mouthpiece shape.
Actually, apart form a bunch of “craft manufacturers”, you won’t find any wood mouthpieces on the major resellers’ websites.
Now, the reason most clarinetists use hard rubber mouthpieces is because:
- They’re super tough and resistant and don’t really require any special type of maintenance
- They just sound great, and the sound depends on the density of the mouthpiece
- They’re affordable, but can also be very high end
Bottom line: they’re the most obvious choice for ANY clarinetist, of any level…
Unless you’re a broke student, in which case you could settle for a plastic mouthpiece. They are durable and cheap which is often what student look for.
The Tip Opening
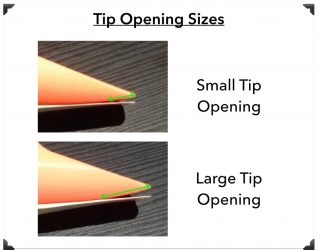
The tip opening is the distance between the reed and the mouth piece, right on the upper edge of both these.
- A big tip opening – requires more air in order to make the reed vibrate and produce a “bigger” sound
- A small tip opening – requires less air for the reed to vibrate and produces a “smaller” sound.
Typically, since air resistance is greater on big tip opening, the rule for matching the reed thickness to the tip opening is:
The bigger the tip opening, the softer the reed.
Which is why beginners generally start with a small tip opening mouthpiece which essentially requires less effort to get a sound out of.
Next up…
The Chamber
The chamber consists of 3 different parts:
The baffle which is a “ramp” that goes down into the bore, inside the mouthpiece. The shape, depth and slope of the baffle all shape the sound.
A not-too-deep baffle will create a resonant sound and a quick response.
On the other hand, a deep baffle with a scooped shape will produce a mellower sound with a slower response.
In the end it really is a matter of HOW FAST the air enters and exits the mouthpiece, and how many “obstacles” it encounters while traveling.
The longer the air takes to travel through the mouthpiece, and the more obstacles it runs against, the mellower the sound, and the slower the initial response.
The Sidewalls
The distance between the sidewalls partly determines the level of air resistance. The further apart the walls, the greater the resistance.
Therefore, to counter balance this resistance:
- Walls that are close together generally require soft reeds, and…
- Walls that are farther apart generally require harder reeds.
The Throat
The throat is the part where the chamber joins the bore. It can be designed in different shapes, 2 being most common:
- “H” frame or parallel shape – the walls are parallels and the sound is similar to the “Ahh” sound. They generally work well with hard reeds
- “A” frame – the throat starts narrow and widens as it reaches the bore and sound similar to an “Eeh” sound. They generally work well with softer reeds.
So these are what you should know about mouthpieces, and probably even more.
Talking about more features (such as the siderails and tiprail thickness or window shape) wouldn’t really make sense…
Unless you’re planning on making your own mouthpiece, or starting a mouthpiece manufacturing business.
Now, keep in mind these are very in-depth concepts and if you’re only looking to improve or change your sound, you don’t need to know all these details, the ones I provided you are more than enough, trust me.
Next up…
Recommended Mouthpieces
So now that we’ve learned a significant amount of information, it’s time to find your perfect mouthpiece.
Here are the models I recommend, ordered in 2 price categories:
Under $100
- Glory Clarinet Plastic Mouthpiece Kit (w/ligature, reed and cover) – (Amazon)
- Selmer Sonata Plastic Mouthpiece – (Amazon)
- Yamaha 4C – (Amazon)
- Vandoren B45 (most popular all-round mouthpiece ever) – (Amazon/Thomann)
- Vandoren B40 – (Amazon/Thomann)
Above $100
- Pomarico Diamond M (Crystal) – (Amazon/Thomann)
- Pomarico Ruby M (Crystal) – (Amazon/Thomann)
- Vandoren M13 – (Amazon/Thomann)
- D’Addario Reserve Evolution – (Amazon/Thomann)
The Reed
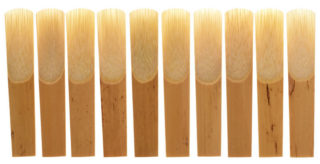
The reed is the thin strip of material that’s placed on the mouthpiece and that vibrates against it.
When shopping for a reed, there are a 2 factors you need to take into consideration:
- The Material – reeds can be made out of wood or plastic
- The Strength – which refers to the thickness of the reed
- The Cut – which refers to the way the upper part of the reed is “carved”
So let’s take a closer look at these features.
1. Material
It can be made out of:
- Cane (wood) – which is the most common material
- Synthetic – which is much less popular but might be used in some contexts
So what are the difference between both materials ? Well, mainly:
- Synthetic reeds – have a significantly increased lifespan and are often recommended for “rough” playing since they can take a lot of abuse, such as in marching band where the volume is constantly very high.
- Cane reeds – are the most popular because they offer much more subtlety and control over dynamics. They do need to be replaced more often than synthetic reeds.
Next up…
2. Strength
The strength of the reed refers to its thickness.
- Hard (thick) reeds – offer high resistance and are harder to play. They are generally played by advanced/professional players. Their sound is full and warm.
- Soft (thin) reeds – offer low resistance, are easier to play and are typically advised for beginners. Their sound is brighter.
Strengths are ordered by numbers ranging from 1 to 5, 1 being the softest.
In the clarinet world, the rule of thumb is that the harder the reed the better the sound…
And although this is highly variable depending on factors such as the brand, the cut or the material, the truth is that you rarely see BEGINNERS playing on hard reeds, or PROFESSIONALS playing on soft reeds.
And so, if you’re a beginner, start on a 1 or 2 strength reed, and move up when you feel it’s too easy to play…
On the opposite end, if you feel you need to make too big of an effort to get some sound out of your horn, you’re probably playing a reed that’s too strong.
Anyway, a good idea is to buy a pack of different strength reeds so you can try a bunch of different ones right of the bat.
Here are some models, and packs that I recommend:
- D’Addario Rico 20-pack, strength 2.5 – (Amazon/Thomann)
- Vandoren CR103, Strength 3, 10-pack – (Amazon/Thomann)
- D’Addario Mitchell Lurie Premium, Strength 3.0, 5-pack – (Amazon/Thomann)
- D’Addario Royal, Strength 2.5, 10-pack – (Amazon/Thomann)
- Goloho Unfiled Cut (American Cut), Strength 2.5-3.0, 10-pack – (Amazon)
- Goloho Filed Cut (French Cut), Strength 2.5-3.0, 10-pack (Amazon)
- Vandoren V12, Strength 3.5+, 10-pack – (Amazon/Thomann)
- Vandoren Sampler pack w/V12, 56 rue Lepic and V21, Strength 3.0-3.5-3.5+ – Amazon)
Got it? Next up…
3. Cut
The cut refers to the way the upper, thinner part of the reed is shaped. There are 2 types of cut:
- Regular or American cut/non-filed – which is the most common cut and the first choice for beginners.
- French File Cut/filed – which is sometimes used by more advanced players since it offers slightly more resistance.
For an in-depth look at the differences between these cuts, watch the video below:
Next up…
The Ligature
Many players — including professional ones — tend to overlook ligatures… UNTIL they try a good one.
Because, at first glance, they really just look like a small piece of metal meant to hold the reed against the mouthpiece.
The thing is; there is much more to the ligature than just a piece of metal.
The ligature actually dictates how much the reed vibrates, for example… Which is actually a pretty big deal, don’t you think?
And although the difference might not be extremely obvious for the listener, it is quite obvious for the player.
In fact MOST players say they really feel a significant improvement in their tone and sound when using a better ligature than the stock one that comes with their clarinet.
So ligatures mainly have 3 varying factors:
- Material – Metal, fabric or even cord can be used for ligatures
- Regular or Inverted – the screws of the ligature can be set up facing the musician (regular) or away from the musician (inverted).
- How tight the ligature is screwed against the reed – the tighter the ligature, the less the reed vibrates and it might end up to close to the mouthpiece. Loosen it too much and the reed might be unstable.
Metal ligatures produce a bright and projecting sound while fabric “dampens” the sound. Generally, orchestra musicians choose metal ligatures so they can be heard, and small groups clarinetists who play in smaller venues might choose fabric ligatures.
Now, if you look around for ligatures you’ll actually notice some companies actually specialize in this part of woodwind instruments…
And among these few niche companies, the brand Silverstein produces probably the most premium and expensive ligatures out there.
Their ligatures are actually more expensive than some entry level clarinets.
That is mainly because they use plated gold, or even white gold and are handmade in the US.
However, advanced and professional players who have tried them all agree they feel an improvement in their sound…
Which is — ultimately — priceless when you play at a professional level.
So anyway, here are the ligatures I recommend, ordered by low to high end:
- Selmer 1719 – (Amazon)
- Rovner Dark 1R – (Amazon/Thomann)
- Vandoren M/O – (Amazon)
- Rovner V-1R – (Amazon/Thomann)
- Silverstein ESTRO – (Amazon)
- Silverstein CRYO4 – (Thomann)
Next up…
The Keys
Since the clarinet has the widest note range of any wind instrument, it has the greatest number of keys as well.
Keys are an important part of the clarinet to say the least, but more so because of the key systems.
Depending on the key system, clarinets either have 17 (French/Boehm system) or 26/27 keys (German/Oehler system).
But let’s take a closer look at these systems; shall we?
Boehm or Oehler System?
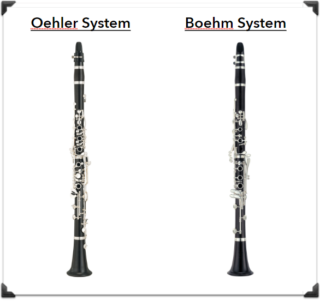
The clarinet is probably the only wind instrument whose keys you should pay attention to before buying.
And that is because there are different LAYOUTS. These layouts are referred to as key system or fingering system and playing on both requires different fingerings.
The general consensus is that Oehler clarinets are MORE DIFFICULT to play that Boehm clarinets, because some notes are harder to reach.
Although there is a handful of key systems, there are 2 major ones and 99% of the clarinetists play either one, or both, with a distinct advantage for the first of this list:
- Boehm system – which is the most common key system worldwide
- Oehler system – which is common almost solely in classical orchestras in Germany and Austria, for classical pieces.
Note that although Boehm clarinets are more common, many clarinet players say it is almost impossible to play classical pieces such as the ones from Mozart or Beethoven on them.
BUT if you’re planning to play anything else (as in anything but classical music), definitely go for a Boehm system.
To check out the difference in sound between both key systems, watch the video below:
Next up…
Materials
The next characteristic you should pay attention to before choosing your clarinet is the materials it is made from.
2 materials are used:
- Wood – which is the most common material
- ABS (Plastic resin) – which is only used for student/entry level clarinets
Most intermediate and professional clarinet players play on clarinets made out of grenadilla wood or more rarely rosewood.
Grenadilla wood is preferred because of its good acoustic properties and relative abundance.
Some of Buffet Crampon’s clarinets are made with a mix of grenadilla wod and carbon fiber so as to provide the instrument with added resistance to humidy and weather changes.
If you’d like to hear the difference in sound between both materials, check out the video below, although to be honest there is no blatant difference (the wood clarinet is on the left):
Next up…
Clarinet Manufacturers

Like with most musical instruments, there is a bunch of manufacturers that grew almost bigger than the instrument itself.
For the clarinets, there are essentially 3 big names, 2 of which are widely regarded as the very best clarinets manufacturers in the world.
These names are:
- Buffet-Crampon – which is the absolute gold standard in the industry.
- Selmer – if you’re familiar with the saxophone, you may know Selmer as the most respected Sax brand. They happen to also make some of the best clarinets in the world.
- Yamaha – Pretty hard to find a musical instrument Yamaha don’t manufacture nowadays; Clarinets are no exceptions.
Recommended Clarinets
Ok so now that you’ve been thoroughly educated on what you should look for in a clarinet, it’s time to actually choose one.
And so for this list I decided to order my recommended models in 2 categories: Student clarinets and Professional clarinets.
Now, not to worry, you don’t need to actually be a student nor a professional player in order to look at those lists, they really only define the price range and overall quality of the instruments.
So if you are a beginner but have a high budget, definitely go for a better instrument, you won’t regret it.
Student Clarinet (Under $750)
- Mendini by Cecilio Beginner Pack – (Amazon)
- Hisonic Signature Series – (Amazon)
- Jean Paul USA – (Amazon)
- Yinfente Rosewood Clarinet – (Amazon)
- Yamaha YCL-255 – (Amazon/Thomann)
- Jupiter JCL-700N – (Amazon)
Professional Clarinets (Above $750)
- Yamaha YCL-450 – (Amazon/Thomann)
- Yamaha YCL-650 – (Amazon/Thomann)
- Selmer CL211 – (Amazon)
- Buffet Crampon E11 – (Amazon/Thomann)
- Buffet Crampon E12 – (Amazon)
- Buffet Crampon R13 – (Amazon/Thomann)
Transposition
Just like the saxophone or the trumpet, the clarinet is a transposing instrument, and depending on the clarinet, transposition will vary.
However, for the sake of this article let’s assume you’re looking at a Bb clarinet, the most common model.
Well, the Bb clarinet is called that way precisely because of transposition, so as to let you know that, when you’ll read and play a C, the note coming out of your clarinet will actually be a Bb…
Meaning the Bb clarinet plays EVERYTHING a full step under concert pitch.
With this method you can then deduce how other clarinets work:
- An “A” clarinet plays one and a half step under concert pitch
- A “C” clarinet plays… well in concert pitch
- An “Eb” clarinet plays one and a half step above concert pitch
- And so on
Next up…
How to Tune your Clarinet
For some reason, beginners often — mistakenly — overlook tuning when it comes to woodwind instruments, and they couldn’t be more wrong.
Because if wind instruments generally fall out of tune less often than, say, string instruments, they still do. And when they do, you should be prepared to tune them back THE RIGHT WAY.
Tuning a clarinet is done by pulling out the barrel to flatten the tone or pushing it in to sharpen the tone.
Now the difference between the clarinet and other instruments is that you’ll need to warm your horn before proceeding to the tuning part…
Which is done by playing it for some time, your breath causing the tone to sharpen, meaning that it will play slightly higher-pitched after you play it a little.
Then, if you’re still not satisfied with the tone, you can proceed to tune the clarinet.
Here’s a quick video explaining all these steps:
Next up…
How to Take Care and Maintain your Clarinet
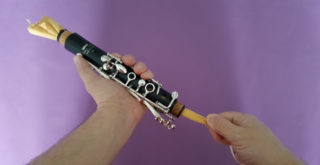
Being a woodwind instrument, the clarinet does require some regular maintenance and care...
The most important steps -applying to the mouthpiece and reed.
And so, BEFORE playing:
- Assemble the parts of the clarinet and apply cork grease (like this one) if you’re finding it difficult to put the pieces together
- Always soak the reed in a cup of water for a couple of minutes, alternatively put it in your mouth to moisturize it with your saliva .
Now, the biggest part of care and maintenance is done AFTER you’re done playing:
- Carefully disassemble the clarinet – only use your fingertips to grab the clarinet and be careful not to bend the keys
- Remove the reed from the mouthpiece – and store it in a reed holder.
- Clean your clarinet:
- Clean the ligature and keywork with a polishing cloth
- Clean the mouthpiece with a small brush and hot water
- Swab all the parts of the clarinet
- Finally, oil all the bores of every part – with a cotton cloth, let the clarinet rest for 15 mn and remove the excess oil that wasn’t absorbed.
Here’s a quick video that shows all the steps to properly clean your clarinet:
Just grab a cleaning kit which has all the tools you’ll need to fully clean and take care of your horn. Here’ are 2 good options:
By the way, if you found this post useful, I highly recommend joining our free Home Recording Secrets email newsletter where you’ll discover….
- How to Get Your First Studio Up and Running in a Single Weekend
- How to Avoid Wasting Thousands of Dollars on Unnecessary Pointless Purchases
- How to Get a “Million Dollar” Pro Studio Sound in a “Thousand Dollar” Home Studio
- PLUS… All Sorts of Other Amazing Insider Secrets Revealed
And it’s totally FREE! Click here and Enter Your Email to Sign Up.