
If you’re shopping research for rack mounts – whether for the studio or stage, you’ve come to the perfect place.
Because by the end of this post you will know:
- Desktop vs Rackmount Studio Gear: When It’s Time To Upgrade
- The Choice of the Professionals: Why Rackmounted Storage is a Must-Have for Anyone Serious About Their Music.
- The 3 Categories of Racks and Which One is Best for You – Right Now
- PLUS…a TON of Links on How to Stack Your Rack With a Bad-Ass Rig – Even if You’re On a Budget
– and much more.
So…What Exactly Belongs in a Rack Mount?

With their first studio rack, newbies have a general sense they might need one – but don’t exactly know why.
And until you do know why, it’s impossible to know what sort of rack to look for.
So let’s clear things up now. For a basic home studio rig, there are 5 key items you’ll likely need:
- a multi-channel mic preamp
- a power conditioner
- a headphone amp
- a monitor management system
- an audio interface
You don’t need to worry about buying them all at once right now. But you still need to have a general sense of the direction you’re ultimately headed.
Then slowly but surely, build it up piece by piece.
Choosing the Right Size – How Many Spaces?
So at this point, you know that at minimum – you’ll eventually need 5 pieces.
But again, that’s just the minimum.
- Sometimes – those pieces could take up multiple spaces.
- Sometimes – you’ll need to leave an open gap for ventilation if something starts overheating.
- And without a doubt – you’ll eventually discover something new you’d like to add, beyond just the basics.
So all things considered, I recommend starting with anywhere from 6-12 spaces – 8 being the perfect starting point.
What Do You Do With All The Extra Spaces?
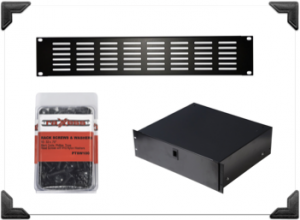
Ever seen a rack with open spaces before? Ugly as hell.
But don’t worry – there’s a solution.
Simply get one of these blank panels – (1U/2U) and you’re good to go.
Not only do they look great, they’re super cheap, perfect for ventilation, and the ideal solution if you’re still building up your rack piece-by-piece.
Want another option? Make good use of those extra spaces by adding a drawer – (1U/2U) for all your random crap (we all have plenty of that stuff, right?).
One more recommendation: get a box of rack screws – (25 count/100 count), and put them in the drawer.
Up next…
The 3 Basic Studio Rack Mount Styles
Ok so now we’re getting to the good stuff. You ready?
Here’s the next thing you need to know:
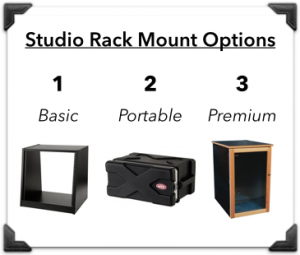
All studio rack mounts fit into 1 of 3 categories:
- Basic Studio Racks – which are cheapest, and ideal for most home studios.
- Portable Racks – which cost more, but are more durable, and more versatile – since they can be used for both stage and studio.
- Premium Studio Racks – which are most expensive, but offer several spectacular features such as temperature control, and noise isolation, and are ideal for pro studios (or any home studio with enough cash).
So here are the top options in each category:
The Best Basic Studio Racks for Home Recording

So here’s the deal: The top 2 manufacturers in this category are:
- Middle Atlantic
- Odyssey
And honestly, there’s really not many differences worth mentioning.
They both get consistently good reviews, both all get the job done – and they both look great. So take your pick.
For Middle Atlantic, here’s what I recommend:
For Odyssey:
Up next…
The Best Portable Racks for Stage and Studio
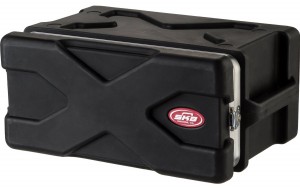
No matter why kind of musician you are – chances are you’re familiar with both SKB and Gator.
Because for several decades now, they’ve been the industry standards in live music – not just for racks, but for pretty much any type of transport gear imaginable.
So in this category, they’re really the only safe bets.
For SKB, here’s what I recommend:
For Gator:
Up next…
The Best High-End Rackmount Systems for Pro Studios
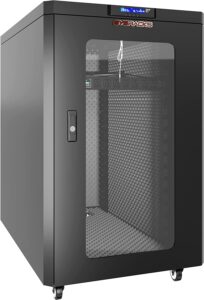
So – when money is no obstacle – what do the pros use?
And more importantly: what exactly does it buy them?
Well let’s start with the second question.
With a high-end studio rackmount system, the most essential features to expect include:
- Noise Reduction – which allows you to position the rack anywhere in the studio, without fear of mechanical or fan noise leaking onto your tracks.
- Silent Cooling – which allows you to fully enclose your gear for maximum noise reduction, without overheating your gear. Silent cooling can be difficult and expensive to engineer (as we all know how noisy a refrigerator is).
- Desktop Computer Storage – since the computer itself is often the noisiest thing in your studio.
- Thermostat – for precise temperature control.
- LCD Display – to monitor all important info at a glance.
- Surge protection – to keep everything safe
No surprise, all these features combined result in a price tag – usually around a couple grand.
If that’s currently in your budget, here’s a great company that I recomend:
Up next…
How to Compile Your Very First Rack From Empty to Full

Ok so at this point, you know everything you need to know to buy the perfect rack for your rig.
But the job’s not done just yet. Because there’s still the matter of filling it up.
If it’s your very first rack, and you’re still a bit confused about how this part is supposed to go, well here’s a quick summary of what to expect – and how to get it all done:
The very first thing you’ll need – to power everything else in the rack, is a power conditioner.
Here are some good options I recommend:
The next thing you’ll likely need is a multi-channel mic preamp – which allows you to record with several microphones/musicians at once..
For help with that, check out this post:
Ideally, since your mic preamps are housed within your rack, it’s best to go with a rackmounted audio interface as well. For help with that part, here’s another link:
From here, you have the absolute minimum components of a working system.
The next thing you’ll most likely need is a headphone amp, since each of your musicians will need their own channel to monitor your playing as you record them.
Here are the ones I recommend:
Now finally, when you start mixing on multiple sets of monitors, you’re going to need a monitor management system as well.
For this piece, here’s one more link for you:
Up next…
Anything Left to Add?
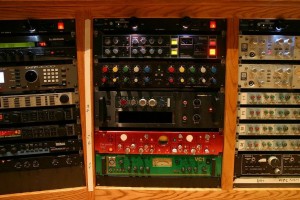
Once you’ve got the 5 key items – you can basically call your studio rack “complete”.
So why is then – that pro studios commonly use hundreds of rackspaces filled with all sorts of fancy gear?
Well typically, most of that gear is high-end hardware processors like:
- EQ
- Compressors
- High-End Digital Converters
- Word-Clocks
- Etc…(the list is much longer than this)
Why? Because they still “sound better” than even the best software plugins – at least according to the ears of the World’s best sound engineers.
For you though, you probably can’t tell the difference – and you probably don’t have the $100k or so that it costs to buy all that stuff anyway.
So for the 99% – it doesn’t really concern you. For the other 1% – it’s way outside the scope of this article.
By the way, if you found this post useful, I highly recommend joining our free Home Recording Secrets email newsletter where you’ll discover….
- How to Get Your First Studio Up and Running in a Single Weekend
- How to Avoid Wasting Thousands of Dollars on Unnecessary Pointless Purchases
- How to Get a “Million Dollar” Pro Studio Sound in a “Thousand Dollar” Home Studio
- PLUS… All Sorts of Other Amazing Insider Secrets Revealed
And it’s totally FREE! Click here and Enter Your Email to Sign Up.